

Composer is a modern, general-purpose package manager for PHP. It allows you to declare the libraries your project needs and install them in one step. However, you may have to learn how to use it before you can benefit from its features.
There are many resources that explain how to install Composer, create a package, and manage the dependencies of your project. But it’s not easy to find detailed explanations of its basic usage.
This article covers everything you need to know about Composer from the beginner level. It explains basic concepts like packages and versioning, details different ways to use it, and provides practical examples of managing dependencies of PHP projects.
What is Composer?
Composer is a dependency management tool for PHP. As the name suggests, it manages the dependencies of your project. It can manage dependencies of any language, but in this article, we’ll discuss its usage in php web application development services only.
The easiest way to understand what Composer does is to compare a modern PHP project with a construction site. The construction site is your project, and the bricks, iron, concrete, and other materials are the dependencies.
A project manager oversees the construction site and makes sure that all materials are available at the right time. If the materials don’t arrive at the right time, the project manager finds a way to compensate for the delay.
Similarly, Composer manages the dependencies of your project. It makes sure all the dependencies are available at the right time. If the dependencies don’t arrive at the right moment, Composer finds a way to compensate for the delay.
How to Install Composer?
Composer installs with a requirement. If your project is a PHP project, you need to include PHP. And if your project is a Python project, you need to install Python and so on. In most cases, the installer is enough to install Composer. However, in some cases, you may need to explicitly build and install Composer.
By using Composer, you can declare the dependencies for your project in a single file, and Composer will handle installing and updating those dependencies for you.
Installing Composer is a simple process.
First, download the Composer installer file from the Composer website. Then, run the installer in your terminal. The installer will ask you for your name and email address. These are used for creating a “~/.composer” directory, which is where Composer will store its files.
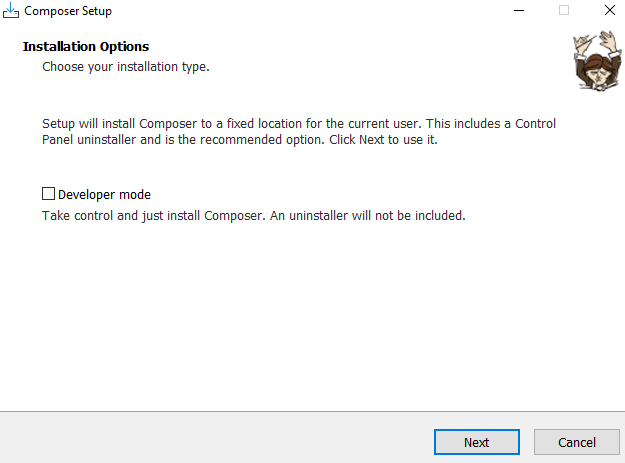
Probing ahead, do not interact with the option indicating the developer mode.
Next, the installer will ask you for the location of your project. This can be either an existing project or a new project. If you're installing Composer for an existing project, you'll need to provide the project's root directory. If you're installing Composer for a new project, you can provide the directory where you want to create your project.
Once the installation is complete, you can run the composer command in your terminal to install dependencies for your project.
Basic Concepts of Composer
Composer allows you to declare the libraries your project depends on and it will manage (install/update) them for you. The composer also provides a command line interface that can be used to generate a skeleton project structure or run tests in your application.
To gain a better understanding of the composer, let’s have a closer look at the fundamental components and their uses.
Package - A package is a set of libraries with a version. It’s like a box that contains all the files related to a library.
Version - Packages are versioned for consistency. Each version contains all the files that are needed to provide the functionality.
Repository - A repository is a collection of packages and the additional files necessary to install those packages on computers. Repositories can be public or private. If a repository is public, you can use it to install packages. If a repository is private, you can use it to share packages with your team.
Requirements - A package can declare its other dependencies in a configuration file called composer.json. This file contains information about the package and its dependencies.
Autoloader - Autoloaders are used to automatically load PHP libraries and classes. This is a common pattern in modern PHP applications, where you have many different classes that each perform some specific task. Autoloading allows you to avoid having to explicitly include each of those files every time you use them.
Vendors - Vendors are files that are not in use. They are loaded only when needed.
The only thing you need to remember from the above list is that the Composer libraries are loaded only when needed. This means that you don’t need to include all the Composer libraries in your code. And this makes Composer one of the fastest package managers for PHP.
Lock your Dependency with a Version Constraint
A version constraint is a rule that specifies the minimum version that should be installed when installing a package. It can also specify the maximum version that can be installed. Let’s say you are installing the monolog library from its own repository. You can install it with a version constraint.
Once the package is installed, Composer will check its version. If the installed version is less than the specified version, Composer will update the package to the specified version.
Conclusion
Composer allows you to declare the libraries your project depends on and install them into your source code directory. This makes it easy to share projects with each other and manage dependencies consistently across all of your projects. If you're a PHP developer, then learning how to use Composer is essential. With Composer, you can easily manage your dependencies, ensuring that your projects are always up to date.